Saturday, June 22, 2013

Please Enter Here

Here we go!

The time has come for the beginning of the big reveal...

The first room up is the MUDROOM.

Once a boring mudroom, is now a chic place to sit, store your stuff and is the FIRST IMPRESSION of our Beach House. 

The focus here was, "I think I will croak if I have to paint any more knotty pine!"  Seriously, that stuff is thirsty and I just didn't have it in me.  Not. even. for. one. more. room.  So for now, she stays natural.  That being said, I knew I needed some pieces that POP and white was my first choice. 

The front door was a grey blue, but I wanted something a little more classic.  I thought really hard about painting it the faintest yellow, but I already had the classic black door paint on hand.  Free wins!  
Plus, I am a sucker for a black pane door with a seagrass shade.  So classic!

In case you don't know, I have a love affair going with shiny back front door.  I have tutorial on how to get a glossy one without using oil paint.

The existing light fixture was a simple jelly jar fixture.  It was cute enough, but I wanted something a little more pizazz...
I tossed around replacing the jelly jar with a mason jar, but the vintage light bulb won.

These antique chairs were a $5 score my Mom made from a tag sale in the 60's.  


 The wood floors were already painted grey, I just purchased a grey/blue striped throw rug for $20 to soften it up.

For now, they stay grey.  I have hung my paint brush up for the Summer...


I found this awesome brass nautical bell at a consignment store for $12.  
Now visitors can let me know when they arrive!  


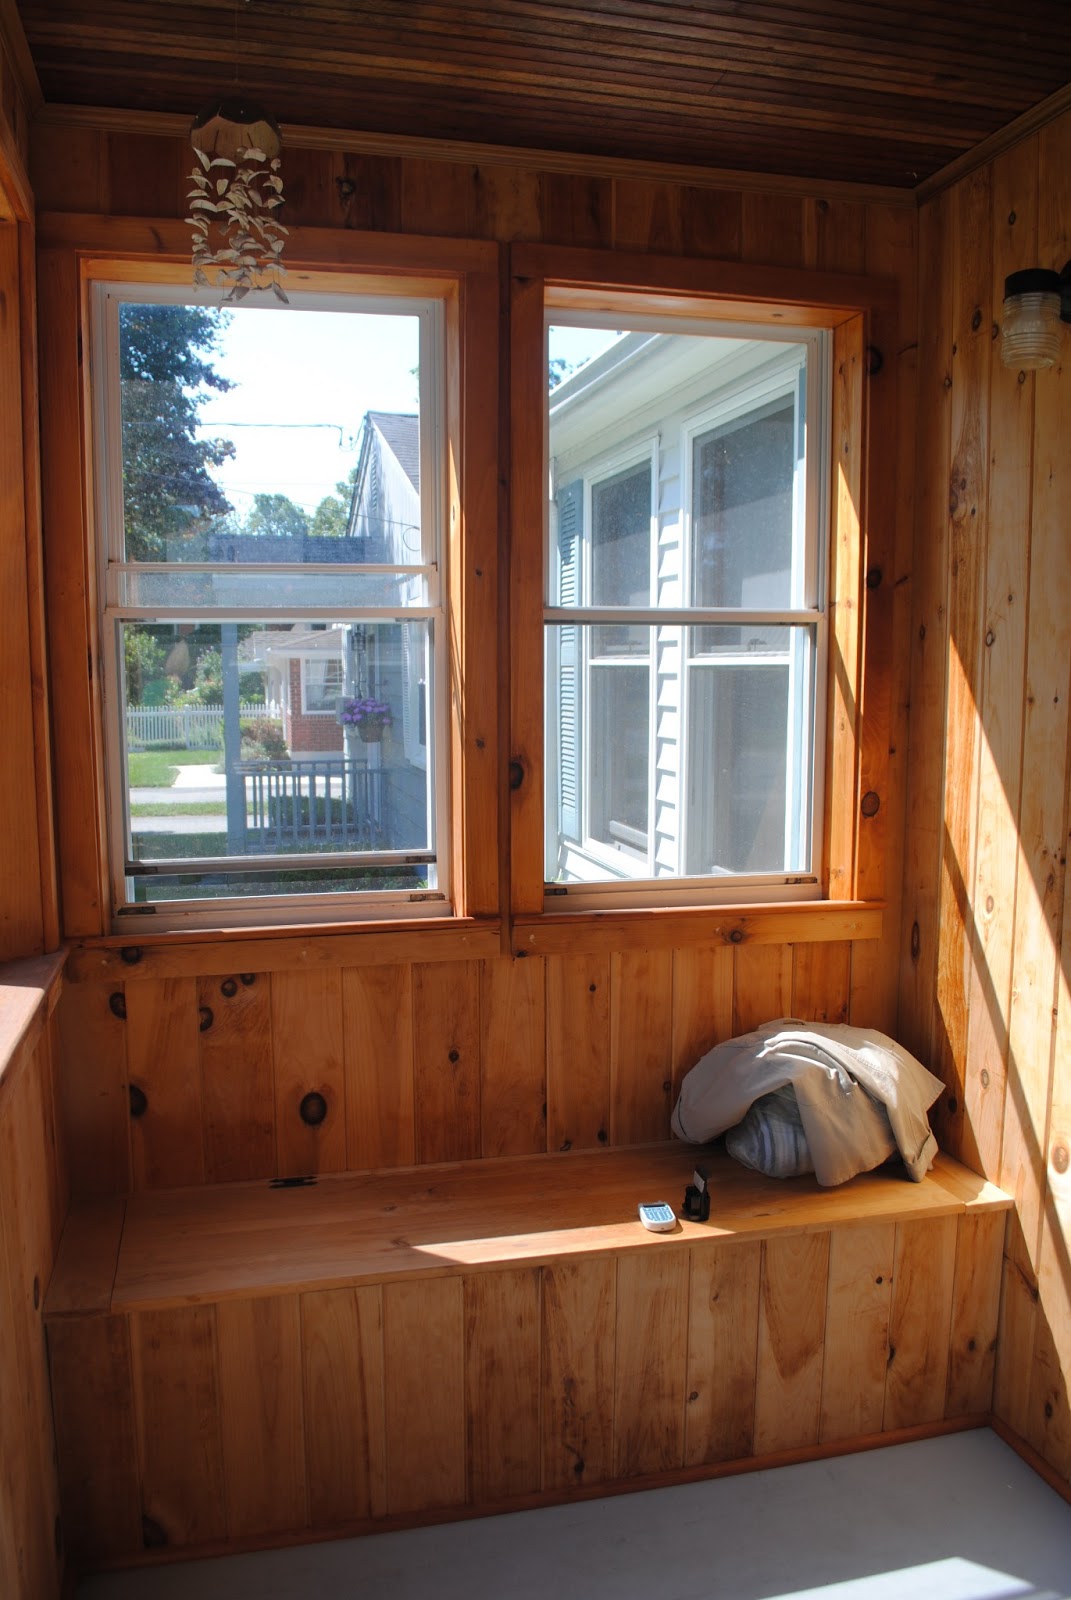
This built-in storage bench is perfect for storing all our beach essentials and our shoes.


What could be more perfect than a chalkboard in a beach house mudroom?  


My favorite CHALKBOARD CHEATING TIP:
Purchased a large photo collage frame for $10 at a discount store....  

Take it apart and paint the frame...

Paint the glass with chalkboard paint and put it back together!
It's as simple as that!

Instant chalkboard for $10 and so much nicer than the crappy one you buy at a craft store!


And as promised, all posts from this point forward will have BEFORE and AFTER pics.

Here's the boring BEFORE:


This front door had so much potential and this color just didn't do it justice.  By painting it black and adding a seagrass shade it instantly makes a statement.


What do you think?  Do you love a black front door?  Does a vintage light bulb turn you on?  


From my house to your house, Happy Hunting!

 photo bcae8504-8846-4d56-8a1e-e38ee54656cf_zpsf2f14c24.jpg

Let's Connect!
 photo pinterest_zpsce3157c2.png  photo facebook_zps6e141a1a.png  photo email_zps02408533.png  photo youtube_zps504f1e67.png

Are you looking for ideas to add to your decor?  Are you stuck in a rut and need some fresh ideas? Let me HUNT for you!  Email me at HousebyHolly@yahoo.com for a consult.


To follow my posts, join me on Facebook.
http://www.facebook.com/HouseByHolly

You can also follow me on HOUZZ.COM and Pinterest.

And as always, I love to hear from MY READERS!  Please leave me comments, post projects you have tried and feel free to ask me questions.

Monday, June 10, 2013

For the VINTAGE lovers...


These chairs have been sitting in my basement for years.  

I've covered them with slipcover chair covers and I've even painted one black and put a chair pad on it.  Never really excited about them.

My mother scored them for $2.50 each from a tag sale in the 60's!  Along with an antique lamp for $5.  After we bought our cottage by the shore, and I decided on a vintage theme, I knew this was my chance to give all three of these pieces the "home" they deserved.


I first started by spray painting the chairs a crisp white.
Once the chairs were painted, I wanted to add some material with my favorite "go to" nailhead  trim.  I picked some leftover fabric from the curtain panel I turned into a shower curtain. 


After cutting my fabric to match the size of the chair pad, I used my finger to space in between the nailhead and hammered away.


The end result:  A vintage chic look and a great place to sit and people watch as I sip on a much deserved glass of wine. 


And the LAMP:


While shopping at Target, I saw a floor lamp that had a white wash treatment on it that inspired me to try it on this lamp.

After lightly sanding the cherry finish, I then mixed white acrylic paint and water 50/50 and applied it to the wood base.


The final step was applying some antique walnut stain I had on hand.


And the cherry on top, if you will, is adding a vintage light bulb.  


This vintage trunk was left behind from a previous owner in a house we purchased and sold a few years ago.  Can you believe it?  Trunks are the bomb right now.  I love it when things like that happen to me!

It is perfect as a coffee table for the kids to play board games and bang it as much as they like. Who cares? 


There are still labels on the trunk dating back to 1914.  

So, there you have it! Some pieces collecting dust in my basement found an official home.  
The best part is I paid NOTHING to do these projects. I just used what I had on hand.  

What do you think? Do you have a love for things vintage?  


From my HOUSE to your HOUSE, HAPPY HUNTING!

Holly

Are you looking for ideas to add to your decor?  Are you stuck in a rut and need some fresh ideas? Let me HUNT for you!  Email me at HousebyHolly@yahoo.com for a consult.
To follow my posts, join me on Facebook.
http://www.facebook.com/HouseByHolly

You can also follow me on HOUZZ.COM and Pinterest.

If you enjoy reading HOUSE by Holly, please click the "like" button at the top of the page for Facebook. Or visit http://www.facebook.com/HouseByHolly and hit "like".  

I will be sharing extra tips and tricks on that Facebook page I created.  

And as always, I love to hear from MY READERS!  Please leave me comments, post projects you have tried and feel free to ask me questions.

Linking to: Just a girl and her blog

TDC Before and After

Savvy Southern Style
The Shabby Nest