
I have not always loved the way our kitchen looked. In fact, I really don't like the light maple cabinetry so I have had to come up with ways to soften it. It has been a long road and we have slowly changed a few things over the last 8 years.
Now, I really like my kitchen!
Here's a peek at the new and improved heart of our home

But it didn't always look this good.
When hubby and I bought the home 8 years ago it was the "model" home in a new neighborhood. Not a finished model, but 85% done. We still got to pick out the flooring on the second floor and the counter-tops, but that was really all. By the time we put our deposit down the builder had just placed the order for the kitchen cabinets and they could not be changed.
Here's some pics from the beginning


And in 2004 after we moved in...
This clearly was before my OCD kicked in...

The counter top is Formica in Labrador.

This is almost embarrassing....WHAT THE HECK WAS I THINKING?!

Then I decided to paint the kitchen Dried Thyme by Dutch Boy. I had to chose a color that wouldn't blend in with the cabinets and this seemed like a good choice.

Major improvement!
We chose Uba Tuba granite mostly because it was the largest piece available to fit the entire island. We felt very strongly about not having a seam on the granite.

We chose a tumbled marble with roping detail.


I love this Pottery Barn wrought iron chandelier with burlap shades. The texture on the burlap is amazing. But for $399 PLUS $100 for the burlap shades...not so amazing.
I found this chandelier and with my coupon codes for 15% off and free shipping --I got it for a steal at $78. It was originally $168 before listed on sale. SCORE!
I knew I wanted the burlap shades, but I didn't want to surrender to the price tag, so I decided to make my own. I was skeptical though....would they look okay? I have never recovered shades, just added ribbon detail...

The hook detail really makes this chandelier.

Isn't she GLORIOUS?!

I am now in love with my kitchen!

I love the way my collection of Wedgwood and Ironstone looks.

My little pie cabinet turned SHOW STOPPER with mirrored medallions is one of my favorite pieces in my house. Everyone comments on that piece of furniture.

It was only $45 at a tagsale.

One of a kind!

I have thought a lot about painting the cabinets cream with an antique glaze on top. Those Rustoleum kits from Lowes look pretty appealing. But hubby doesn't agree. The cabinets are fairly new and in great condition--why mess with it? We also got 2 quotes to reface the cabinets at over $16,000.


MINI SHADES 8 x $4 = 32
BURLAP material $2
CHANDELIER $78
TOTAL $112
*Sold old kitchen light on Craigslist for $50
That's what you call Bedazzling on a Budget!

Ta Da!
What do you think? I am now on the HUNT for a fantastic lantern like this one to dangle right above my table.

Maybe I will find it for a fraction of the cost, maybe I won't...
From my HOUSE to your HOUSE, HAPPY HUNTING!
Holly
***TUTORIAL***

Line the seam of the shade up the the edge and roll out the shade.
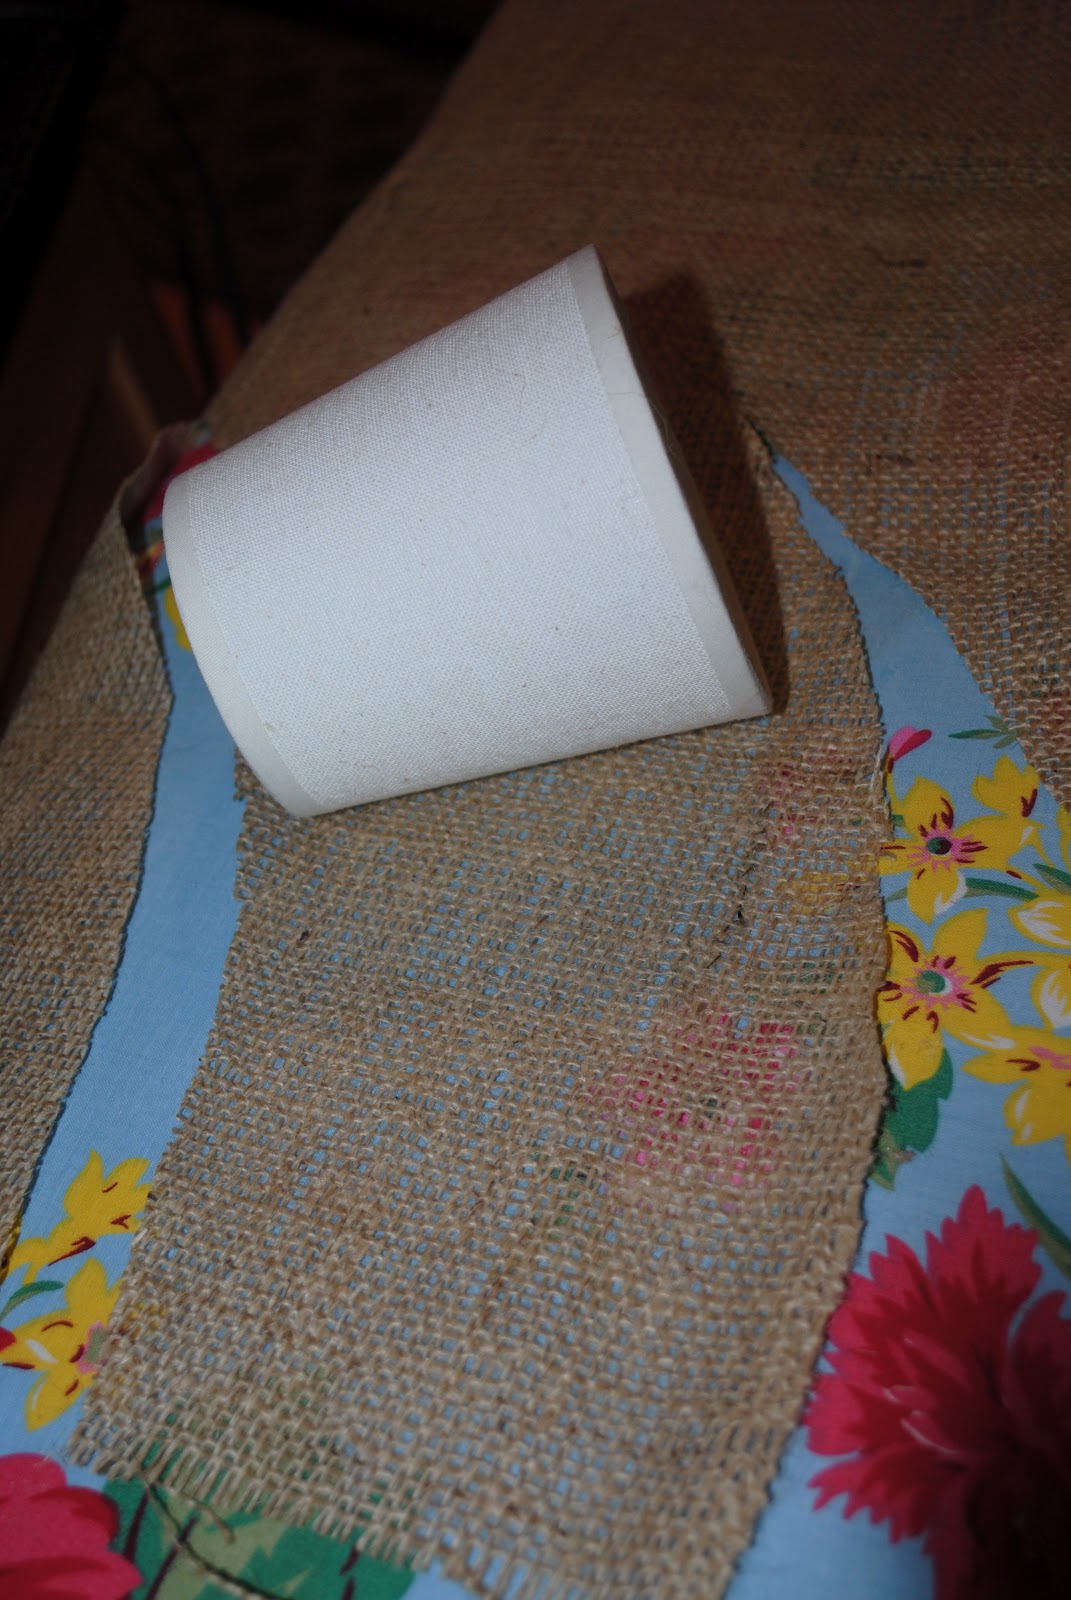
Cut the material as you roll it. When the seam of the shade makes it to the other side, you know you have the full length.

I decided to cut all eight pieces at once so I could start the assembly line. OR if you want you can see how the first one turns out before you cut.

I ironed each piece of burlap separately on the highest setting for a couple of minutes.

I started edge to edge. Edge of fabric to seam of shade. I used my trusty glue gun.

Line up the edge.

press down on the edge and roll the shade down the fabric for a tight fit.

Then run the glue down the seam, press and cut the burlap to have a straight seam

trim the edges of both sides to have enough material to glue the edge inwards.


put glue around the top and fold the edge of the burlap inwards. Repeat for the bottom of the shade.

DONE!
To follow my projects and share my posts, join me on Facebook.
And as always, I love to hear from MY READERS! Please leave me comments, post projects you have tried and feel free to ask me questions.
If you enjoy reading HOUSE by Holly, please click the "like" button at the top of the page for Facebook. Or visit http://www.facebook.com/HouseByHolly and hit "like". I will be sharing extra tips and tricks on that Facebook page I created. And as always, I love to hear from MY READERS! Please leave me comments, post projects you have tried and feel free to ask me questions.
The Shabby Nest
Savvy Southern Style
A Stroll Thru Life
Jennifer Rizzo
The Shabby Nest
Great job on the shades. Your kitchen is very nice. Great upgrades. That lantern would look great. I have seen many of those at the Ballard's outlet here.
ReplyDeleteHi - Now I know what I want to do with some of my shades!!! Thanks so much - looks great!
ReplyDeleteI am on Miss Mustardseed's furniture feature Friday also. I am the Transformed Stainless Range Hood - please check it out and let me know what you think!!!
Linda
PS - I am a new follower...hopefully you will follow me!
Wow! Your kitchen looks great! Love the burlap shades! (Or burlap anything!)
ReplyDeleteFound you via A Stroll Through Life. I am your newest follower!
xo-Lisa
Your kitchen is gorgeous and I love that chandy. Perfect addition. Thanks tons for joining TTT. Hugs, Marty
ReplyDeleteLighting can really make a big difference, I love that you restyled what you already had. Great job :)
ReplyDeletelooks great! love the cabinet in eating area!
ReplyDeleteI have your old island fixture and I WANT your new island fixture...:-) love the new look and all you've done in your kitchen..
ReplyDeletecould you tell me what base color your wall paint has-- by that I mean, is it a yellow base green or a blue base green.
thanks so much'
Sonny
Thanks so much for the nice comments Sonny! You can have it too for $78! ;)
DeleteThe paint is a yellow base green. It just warms the room right up.
Thanks for checking it out.
Take Care,
Holly
Your kitchen is very pretty! I, too , have maple cabinets. There are worse thing in life. Thanks for sharing your beautiful home!
ReplyDeleteThere are lots of things to bringing in with you. You can hire long distance moving companies denver for moving your things unharmed. There are many companies which do moving but they are very unprofessional and break down lots of furniture and belongings.
ReplyDeleteIt is really looking awesome concept of remodeling. You should also choose to modify the bath for the older persons of your family. They face many difficult problem physically. Check here for the bath aids and other mobility aids.
ReplyDeleteCognac kitchen cabinets are a stylish and warm type of wood cabinetry that can bring a sophisticated touch to any kitchen. Cognac refers to a color that is similar to the warm amber hue of a fine cognac liquor, which gives the cabinets their distinctive appearance. This type of wood cabinetry can range in color from a light to a dark amber hue and can be made from a variety of wood species, such as cherry, maple, or oak.
ReplyDelete