Friday, April 27, 2012

The Power of SPRAY Paint...

HOWDY Ya'll!

The weather has been fantastic the last couple of weeks and we have entered into what I like to call "Spray Paint Season".

I spend so much money on spray paint I think a FREQUENT SPRAY REWARDS CARD is in order here!  Perhaps I need to have a conversation with Walmart and Lowes...or better yet Krylon...

Thank goodness for spray paint!  Spray paint has the power to take something from drab to fab.

Spray paint can give an object a NEW LIFE...

I have spent MANY a minutes scanning over all the beautiful colors they have to offer all Walmart and Lowes.  Seriously guys, they have just about ANY color you fancy.

I always like to highlight one color that pops in each room.  It can be a piece of furniture, a lamp or some frames. Either red, turquoise, apple green, hot pink, navy--are all neutrals that work.  If you love a color that is in your rug or curtains pull it out and repeat it a few times.  It really makes a room fun.

Here are a few  projects I completed to kick off Spray Paint Season!

FINIALS


These finals were a sweet purchase from a bargain store for $8 each.  The terracotta is not-so-great, but painted cream or antique bronze, they are SHOW STOPPERS.  


Nice embellishments for the yard or inside the house.


You can tuck these little guys anywhere!


I love these so much, I bought two last fall and two more last week.  

HORSE BOOKEND


I decided to give the little horse bookend I found at Goodwill a fresh coat of ivory glossy paint.  I am so into white porcelain right now and I think it's just what this little horse needs...


 The look is so classic!  I am in love!


I lightly sanded the horse and used Valspar The Perfect Finish in gloss spray paint.  Not one drip!  This is one of my favorite things to do with ceramics....just because the pattern or color doesn't work, doesn't mean you can't use it.   


HOUSE LANTERN'S

Our garage lanterns have lost their fizzle.  My hubby was actually considering purchasing NEW lights...

        Have no fear...HOUSE BY HOLLY is here!


With a fresh coat of black satin spray paint they are PRISTINE.

Who's your MAMA?!


LAMPS


You may recognize this lamp I purchased from Goodwill and featured on "An Itch".  Click here to see my Thrift Store Adventure. With two kids. 


See the pop of red....I love this table.  It makes our family room fun. 


I don't have the "before" of this lamp, but if you could imagine one of those hideous brass lamps from the 80's--complete with a pinch pleated lamp shade. I painted it ivory and covered a shade with tissue paper ruffles.  Click here to see my cool ideas to embellish a little girls room with items you have hanging around your house.


CHAIR


This chair was a steal for $10 at a tagsale.   Ivory spray paint, damask burlap fabric and a little nail head trim completely transform this chair.  


This chair now sits in my foyer that is newly REFRESHED.  Click here  to see my small closet turned mudroom.

FRAMES


This frame was okay, but I could see it making a statement in a whole new way.


Adorable for a kids room!


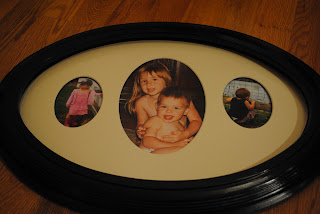
I had a hodgepodge of frames that I spray painted satin black.  I purchased some mattes that all match to unify them as well.  This project could have cost a pretty penny if I bought all new frames that were the same color.  This is a super easy project with a big impact.  I may take this to another level and use scrapbook paper with various patterns and colors to cover the mattes. 


COO COO CLOCK

Nanny's German Coo Coo Clock was definitely a childhood favorite.  But I wanted to make it modern.


I also considered an apple green or a purple, but the robin egg blue won!


In a collage with a hodgepodge of some more frames, but this time I was going for a FUN look.  The pops of color on a couple of the frames is whimsical.  


Happy Spray Painting Season People!


If you enjoy reading HOUSE by Holly, please click the "like" button at the top of the page for Facebook. Or visit http://www.facebook.com/HouseByHolly and hit "like".  I will be sharing extra tips and tricks on that Facebook page I created.  And as always, I love to hear from MY READERS!  Please leave me comments, post projects you have tried and feel free to ask me questions.

From my HOUSE to your HOUSE, HAPPY HUNTING!

 photo bcae8504-8846-4d56-8a1e-e38ee54656cf_zpsf2f14c24.jpg


UPDATE--
My friend Casey was inspired after reading my post and dragged these lanterns out of her garage to spray paint. 

They look brand spankin' NEW!


Keep up the great work Casey!


Come on People!!! Show me what YOU are spray painting...post a pic on my Facebook page  http://www.facebook.com/HouseByHolly.


Linking to
 Southern Hospitality
Jennifer Rizzo
Savy Southern Style
Shabby Nest
Thrifty Decor Chick
Watch Out Martha
Savy Southern Style
Tatertots and Jello


Friday, April 13, 2012

How To EMBELLISH a little girls room for under $40

Hello People!
I am so excited to publish this post today!  I have been wanting to refresh my daughters room for some time. Here's the kicker...I wanted to see how I could do it without spending any money.

THIS is what I was born to do people!  Remember Nanny's garage?  Let's do this!

This is BY FAR my favorite project yet and was the most fun.    Okay..I really loved the post On the Side of the Road too...

WARNING: You will NEVER look at some of the items in your home the same way.  Popsicle sticks, tissue paper, coffee filters, birth announcements, thank you notes, wrapping paper, tree branches,  magazines, a sheet, a canvas and some hand-me-downs from the 70's.  To name a few!

I do often imagine myself being on the Nate Berkus Show or Ellen, we would play a game where they would give me an object and I would have to come up with another use for it.  The more objects I could REPURPOSE, the bigger the prize I would get.  I don't know... like a $5,000 shoppping spree!  It is just something I am able to do...maybe it is my SECRET POWER...


Here's a peek at my daughters NEW ROOM--


TA DA!


Pom Pom's on a string of lights!


Every little girl should have pom  pom's on a string of lights in her room!


This is so perfect at night, while your daughter has "quiet time" before bed and then you read a story.

This would be awesome for the Forth of July using red white and blue or all white for a summer party in the backyard.  I can see them hanging from trees or hanging on your patio.  Amazing!
$5


My dollhouse from some 30 + years ago. I gave it a fresh coat of paint, made the shutters from black popsicle sticks, and painted the door red.  There ya have it!
$0


I also embellished our little tree that I featured in my Just For Kids Tab.
Who knew a branch from the front yard painted white would be so much fun?!  Let's give her a a few little pom pom's too!
$0 


I purchased this lamp for $10 at Goodwill last month along with the lamp I featured on An Itch.  It was a brass beast!  But not any more...
Add tissue paper to the shade and a tassel to the switch for instant flair! The tissue looks just like ruffles and ruffles of flowers.
$10


Butterfly stamp specimen artwork made from thank you notes and birthday invitations....so easy! Click here for the inspiration.
$0


Framed scrapbook paper and homemade handprints.  The green frame hung in MY nursery and held some cooky 70's artwork.  I love the pop of green in her room!
$.50
 Nanny's Coo Coo clock painted robin egg blue!  
$3


Man, I loved that Coo Coo clock when I was a kid!
Now, my daughter can love it too, but in another color.


I added ribbon to the chandelier shades.  Easiest trick in the book!  The bird and crystals are a nice touch too.
$3


Scrapbook paper letter board.  An old oval frame, insert scrapbook paper and cover a letter in scrapbook paper.  Perfect gift for any little boy or girl!
$1

Magazine butterflies hanging on fishing line!  So.freaking.cool.
$0


My moms old armoire, from you guessed it--the 70's!  With a fresh coat of ivory paint.  Absolutley LOVE the detail on this armoire!
$0


I have a confession--I do sometimes sneak into my daughters room and rearrange the furniture in her dollhouse.  Is that weird?  


A fabric board fit for my little crafter!  An old painting canvas and a random yellow gingham flat sheet.  I lined  it out with hot pink ribbon and bought some adorable buttons. 
$5


The buttons really add a fun touch!

Hannah's NEW dressing area!  All her dress-up stuff is inside that chest for a snappy clean-up! 
 $0
The bunny board is a project I made in Girl Scouts.  My mom saved it all those years--so glad she did.   A bunny stamp and white knobs for the tail...brilliant idea.  Troop #1016, baby!


We visited Disney World last fall and I thought Hannah would love the constant reminder.  These frames were in the basement and were part of a collection of bathroom art decor.  I literally just popped these pictures right in.  
$2


Since I am from Texas, I will always be a cowgirl at heart!
And so will my daughter.


What do you think?  Do you think she loves it?

I think it's a perfect fit!  The tutorials can be found below.


 photo bcae8504-8846-4d56-8a1e-e38ee54656cf_zpsf2f14c24.jpg

Let's Connect!
 photo pinterest_zpsce3157c2.png  photo facebook_zps6e141a1a.png  photo email_zps02408533.png  photo youtube_zps504f1e67.png


For some great ideas for a BOYS ROOM-- click here.


Tutorials:

Pom Pom String lights: 


I keep seeing these pom pom's all over Pinterest and I had a snappy little idea to add them to this string of lights I had on hand.  The fact that you can light them up seemed even more whimsical!


I purchased various colors of tissue paper for about $5.   I spread each color out with it's like colors and folded it up.  Then cut 3-4 inch squares.  One time around cutting 20-30 circles.  Keep in mind the bigger the circle, the bigger the poof, and the more tissue paper you need.  You also may want them to be all different sizes, start with one size, one color  and then cut the next color and decide on the size.  
You can also use coffee filters.


I just made a cone with each circle and glued around and around...


Look how pretty they are all lit up! Reminds me of a beautiful hot pink rose--my favorite!  (My little "helper" is caught sleeping on the job...)

Lamp Shade: 
 Same technique with just white tissue paper or coffee filters.  (Obviously, both lights are only on for a short amount of time and have low wattage bulbs.)


Front door Wreath: I had another idea using these same pom pom's for a  front door wreath...  Get your Spring on Ya'll!

Framed Letter:


I purchased some fun scrapbook paper to cover an existing "H" I had.  You just simply trace the letter and cut it out with scissors.


Super easy!


       I recycled this unused frame and painted it ivory.


Just insert scrap paper and glue the letter on.  This would also be beautiful hanging from ribbon.

Butterfly Specimen Artwork:
I punched various butterflies from recycled thank you notes, birth announcements, wrapping paper and scrap book paper using my craft store butterfly punch.  I picked another piece of scrapbook paper for my backing that had a pattern so I could easily space out the butterflies.  Just squeeze the wings together and hot glue to the backing.  


Magazine Butterflies:
Click here to see my inspiration.   I do make mine a little differently, but I can't take all the credit.   I used a Spring issue of Vogue, but any magazine would do.
Cut two squares and fold like those fans we used to make in elementary school.  The top square should be slightly bigger than the bottom.


Tie together with thread, ribbon or raffia.


Round the top wings and blunt cut the bottom wings.  The more you make the better you will get and you will get into a GROOVE.

Fly little butterfly, FLY!

You could hang them from the window, chandelier, or all along the wall.  So.much.fun.


Here's what else you do with those little amazing butterflies--click here to see my post.


Fabric Memory Board:


What little girls room wouldn't be complete without a fabric memory board?  An old canvas and a flat sheet.  Get out that glue gun and get to stretching!  


 I had some hot pink ribbon and marked off where the lines should be.  A little trip to the local craft store for some adorable buttons and I (of course!) hot glued them...


Quick Tip:  Look for an old sweater or skirt with cute buttons to recycle for this purpose.


The Coo Coo clock BEFORE


Total for this HUNT--$29.50

From my HOUSE to your HOUSE, HAPPY HUNTING!
Thanks for stopping by!


To follow my projects and share my posts, join me on Facebook.


And as always, I love to hear from MY READERS!  Please leave me comments, post projects you have tried and feel free to ask me questions.


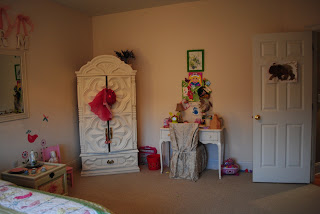
Here's Hannah's room BEFORE ...


Amazing how you can just CHANGE everything around, REFRESH it, and it looks so much better.  I have been trying to do this to Hannah's room for a long time.  I know we will both enjoy it!


Linking to:

Kids' Spaces link up party on www.emilyaclark.com


Finding Fabulous (for less)
Thrifty Decor Chick
Southern Hospitality
Jennifer Rizzo
The Shabby Nest
Savvy Southern Style
Watch Out Martha
Tatertots and Jello